Back to the base tools section.
Video section
Part 1:
Alternative video links:
Part 2:
Alternative video links:
Part 3:
Alternative video links:
Part 4:
Alternative video links:
Docker for Developers: First Steps
Base concepts
Before we start working with Docker, there are at least two concepts, that should be introduced (and explained): images and containers.
(In the last episode, some theoretical background on containers was introduced, so this topic may be more familiar.)
If you know OOP (Object-Oriented Programming) theory, you know about classes and objects, and about the relation between them. In general, class is a kind of template for object. If you don’t know the theory, just think about some template: it’s something, that is used as a base for something else (usually more specific).
When it comes to Docker, and its images and container, images can be regarded as templates for containers. What you should know about containers now is that they “encapsulate” some environment (software + configuration), that is run on the OS kernel. In general, such environment can be everything we want it to be, so it can be quite simple, but also it can be very complex. In the latter case, it would be very difficult (and time-consuming) to create such environment. What is needed here, is some kind of template, built once, and then just used many times, to initiate (or create) the needed environment, to work on. Images are exactly this - they are templates, used to create containers.
The important point about Docker images is they should be minimal: as simple, as possible. As you should know by now, containers are used (and meant) to solve some important problem. The solution is not for free, though, it has its price. The price is paid in both memory, and other computer resources usage (mainly in CPU computational power and time). Of course, the price should be also as low, as possible - no one wants to pay too much. The only way to lower the price is to make Docker images as minimal (and simple), as they can be. The smaller image means the smaller weight of container. (And remember: there may be many containers running, based on the same, single image.)
Alpine Linux
So we all want our Docker images to be minimal (and probably also simple). The problem is: how to achieve this goal? (And why the heck the title of this section is “Alpine Linux”?)
It’s possible, that you’ve never heard of Alpine Linux before. I hadn’t, before I started using Docker. Even right now, I still don’t use Alpine Linux outside Docker containers. So, why is this Alpine so important?
The answer is in Alpine’s size. Comparing to more mainstream GNU/Linux distributions (let’s just assume they are Debian, Ubuntu, Fedora, and other very popular ones), Alpine is muuuch more lightweight. The base image of such mainstream distrubution (and the base image is usually stripped off of all not needed software, so it is quite minimal by itself) is usually about 50MB or 80MB. Well, I haven’t checked it, but AFAIR the Alpine Linux base image size is about 5MB. Believe me: it really makes a difference. (Especially when several such images have to be run at once.)
(And, please, do not believe me - go ahead, and check the image sizes by yourself, on the hub.docker.com website.)
That’s the reason, why Alpine Linux is a really good solution, in the following use-cases:
- when some running service is needed
And the service is some server, of course. It can be an HTTP server, or some message broker, or whatever else, that should be just running, and doing its job, 24/7 (or while developers work hard to meet deadlines made by their managers, who have no idea on how hard software development is…). - when some specific software is needed, and it’s not installed in our OS
The point is, with Docker, software no longer has to be installed in OS.
In fact, installing software in OS, sometimes can make things more difficult and complex. Everything installed OS-wide have to be maintained by system’s administrator. Besides, sometimes users may need software, that is not available in software repository. Such situations happen quite often, when we think of partcular versions of software.
For example, let’s assume, that Python 3.9 is needed. (Or, if you are from the future, it can be Python 4.9.) In our system, only Python 3.6 is available. Instead of installing Python 3.9 (from source, or from some prepared package), we can just use a container, with Python 3.9.
In such cases, containers usually are not needed as long-running processes. On the contrary: they are created only to run the specific software (Python 3.9, and some script, probably), and then they are no longer needed. So, in fact, containers are used as tools: we take them, when we need them, and when we don’t need them, we put them back.
That’s the case for Docker containers, when developers need particular versions of Python, Node.js, or PHP interpreters.
And since many such tools may be needed, it would be wise to use minimal Docker images, like the ones based on Alpine Linux.
It seems that Alpine Linux is a great tool. It is, indeed. Yet there’s some interesting question to ask here: why on Earth other distrubutions are so large, in comparison to Alpine? What makes Alpine so small, so minimal?
The answer is: some specific software, used in Alpine, choosed carefully, to make distro minimal, yet fully-functional. One of such things is the musl library. Most so-called mainstream distributions use the glibc library (the base system library, without which almost nothing could work). Alpine uses musl. It’s a different library, much more lightweight - in comparison to glibc. Using a different base library has a profound implications, though.
Whenever a C (or C++) code is compiled, it is (probably) linked to the base system C library. When it is done on Alpine Linux, the base library is musl. So, the compiled code depends on the musl library. It means, that when the code is used on some other distrubution, which doesn’t use musl, it won’t run.
So, if someone wants to develop games in C (or C++), and build compiled versions to be run on distributions like Ubuntu, using Alpine Linux Docker image may not be a good solution. (Oh, I believe it is possible, but is it worth it? I doubt so.)
Fortunatelly, that problem is not important, when all we need is just running interpreter (like Node.js, Python or PHP).
Docker installation
I’m going to put it straight: I use Ubuntu. It’s not perfect, but I use it, and I don’t have access to any other OS. (Besides, let’s get real: it’s just Docker installation, how hard can it be? Come on…)
So, I’m going to describe the Docker installation process on Ubuntu 20.04 LTS. (Probably the process is very similar to other Ubuntu versions - I also use 18.04 LTS.)
Well, all that is needed to install Docker on Ubuntu is the command:
# apt install docker.io
(BTW, there is also the docker package. I don’t remember the difference between docker and docker.io, but I remember, that the docker.io package should be installed.)
If you really need to watch the installation process, go ahead, watch the film at the top of this page (part 1). Installation starts at 15:00. Do not expect any fireworks, though.
Anyway, after the Docker has been installed, the docker command should be available. If you work on Ubuntu, your user should also belong to the docker group (or you won’t be able to communicate with the Docker daemon, and therefore managing images and containers; you’ll see some unpleasant error messages instead).
Please, remember: there’s no reason to use Docker as root!
Docker images management
Before any container can be created, some images are needed. The docker app provides three simple commands for images management:
docker images- lists all the available images.docker pull <image>- pulls a new image to the local machine.docker rmi <image id>- removes the image from the local machine.
The essential question is: where can the images be pulled from? Well, the base website (or repository) to look at is hub.docker.com. Go ahead, visit the site, and try to find some small, base Alpine Linux image.
Please, do a simple exercise. First, check all the installed images:
$ docker images
If this command is executed right after the Docker has been installed, the images list should be empty.
In order to pull an image, the following command should be executed:
$ docker pull alpine:3.13
The alpine part is the name of image, and the 3.13 part is the tag. In general, any Docker image can have many tags: they are the way to make distinction between various versions of the same (or very similar) image.
After the image has been pulled, the images list can be examined once again. The new image should be there.
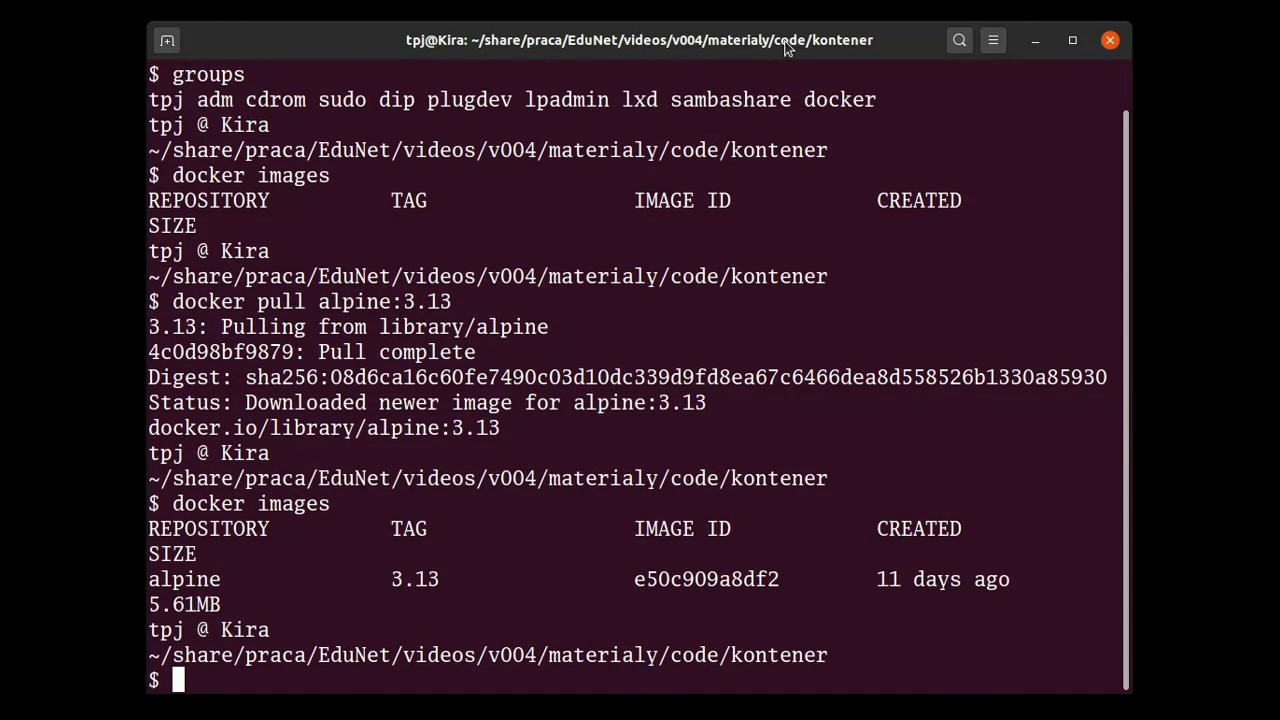
Please note the IMAGE ID column: it provides a very useful information. In Docker, each image is identified by some unique identifier. It’s a non-readable (at least for mere mortals) sequence of characters (I think it’s a hex hash). It is needed, when we want to get rid of some image:
$ docker rmi e50
Oh, yes. There’s no need to type the whole identifier (or to copy-paste it). Docker is smart enough to find the image provided that some unique part of its identifier is given. (Of course, it saves keystrokes, so it’s a useful tip to learn.)
Docker containers commands
Managing Docker images may seem to be quite simple: only three commands were used. Managing Docker containers is much more serious task (and also more useful: the whole magic happens in containers, not in images). Let’s review some base commands:
-
docker ps- lists all active (running) containers.
When a list of all containers is needed (both active and inactive), the-aflag can be used:docker ps -a.
And yes, this command is similar to the GNU/Linuxpsone. -
docker run <options>- starts a new container.
That’s probably the most useful command, and also the most complex one. There are many options, and some of them will be demonstrated later. In fact, those options are the reason, why this command is so complex. -
docker exec <options>- starts a new process, in some running container.
Useful, when someone wants to start a new (shell) session in some container.
It should be noted, that the new process doesn’t have to be a shell, though. It can be any process (which can be started inside the container). -
docker rm <container id>- removes unneeded container(s).
There are only (?) four commands, in comparison to three ones already explained (the fourth, new one is this exec, which would make no sense for images). Not too bad, you think? Well, think again. Managing containers is much more complex task.
Starting the first container
The first task is simple:
- Start a new container, based on the Alpine Linux image.
- …and then, just do something useful with it.
Perhaps it’s not very ambitious, but it’s just a start.
Before the container is started, it would be wise to check, whether the Alpine image has been pulled. It can be done with the docker images command. And when the image is available, I would also advice to check the result of the docker ps command (also with the -a flag). Later, after our first container is run, it will be interesting to use those commands once more, and compare the results.
So, let’s proceed to the first step, and run the container, using the following command:
$ docker run alpine:3.13
After hitting the ENTER key, your machine may “think” for a while, and then… it should return the to well-known shell prompt (just as presented in the following screenshot).

Have you expected something else? Something more spectacular? Some fireworks, fanfares, perhaps angel’s choirs, singing blessings and hailing the Lord? Sorry, not this time. It seems, that nothing has happened. (It’s not true, as will be explained soon.)
The good point is, there are no any error messages. It means, that whatever has happend, it was without any problems. Yet it still looks like nothing has happened, at all. Where is the container?
Well, using the docker ps command, any working container can be found. Unfortunatelly, the result of this command shows no active containers. But let’s don’t give up yet, there’s always the -a flag to help, so let’s try the docker ps -a command.

There it is: an undeniable proof that the container was created, and then finished, and now is inactive. The container was assigned the identifier dcdfde... (something not very readable for a mere mortal human being), it was created basing on the Alpine image, and the process run inside the container was the /bin/sh command, which is a simple shell.
(Where did the /bin/sh command come from? Well, in the case of alpine:3.13 image, this is the default command to run, if nothing else is specified. Usually Docker images have such default commands.)
The question is: why the container was shut down? What has actually happened?
When the docker run alpine:3.13 command was executed, Docker created a new container. Inside the new container, the /bin/sh process was started (the default command for the image, since nothing else was specified). Then, since no input was provided to the running (shell) process, the process had been finished. It was the only process in the container, so no other processes left running. In such situation, container is shut down.
It’s good to understand, what has actually happened. It would be much better, though, to know what should be done to make some use of the created container. There’s no use in creating containers, which are shut down right after they were created.
In order to work with the shell (process) run inside a new container, it should be created in a slightly different way:
$ docker run -it alpine:3.13
The -i flag sends the standard input to the process run inside the created container. The -t flag attaches the terminal to the process. The options, used together, allow to interact with the (shell) process, inside the container, using keyboard, and watching the results in terminal. In other words, it is possible to do normal job in terminal, inside the container.

How can we know, that the shell actually runs inside the container? For the following reasons:
-
The shell prompt. It’s a different prompt. Moreover, it suggests, that the user is the root!
And, in fact, that’s the truth. While working as root in a GNU/Linux system is not good idea (and is done only when really neccessary), working as root inside a Docker container is not so strange, not something very wrong. It’s true, that as a root, much damage can be done. In fact, someone could even wipe out the whole system running in the container! (Probably the container would then crash - I suppose, I have never tried it.) And what would happen? Well, since container is isolated from the host OS, the host OS wouldn’t be affected at all, and a brand new container could be created. So, working as root is not so dangerous, when done inside a Docker container. No reasons to worry about it, thanks to the isolation concept applied here. -
In the host OS, Docker is installed, and the
dockercommand is available. There’s no such command inside the running container (since Docker is not installed there). It can be checked with thewhich dockercommand (no such command should be found.) -
There’s a different filesystem inside container. It can be explored with the known GNU/Linux commands (
ls,cd, etc.).
One more interesting thing to note is the list of processes, running inside container. Just to remind you, such a list can be obtained with the ps -a command.

Although there are two processes listed, in fact only one of them is active inside the container. The process of PID=9 was the ps -a command itself, and it has already finished, so only one process remained, the original /bin/sh, started when the container was created.
Let’s try to perform a simple exercise: run a separate session inside the running container, using a separate terminal. In order to do this, the docker exec command has to be used, and in order to use that command, the container id has to be known. This id can be obtained with the docker ps command. In the end, the command is:
$ docker exec -it bb /bin/sh
where the bb part are the first characters of the running container’s id. (It’s enough to specify only the first characters, as long as they allow to identify the container.)
In the new session (shell process), it’s interesting to check all the processes. It can be done with the ps -a command:
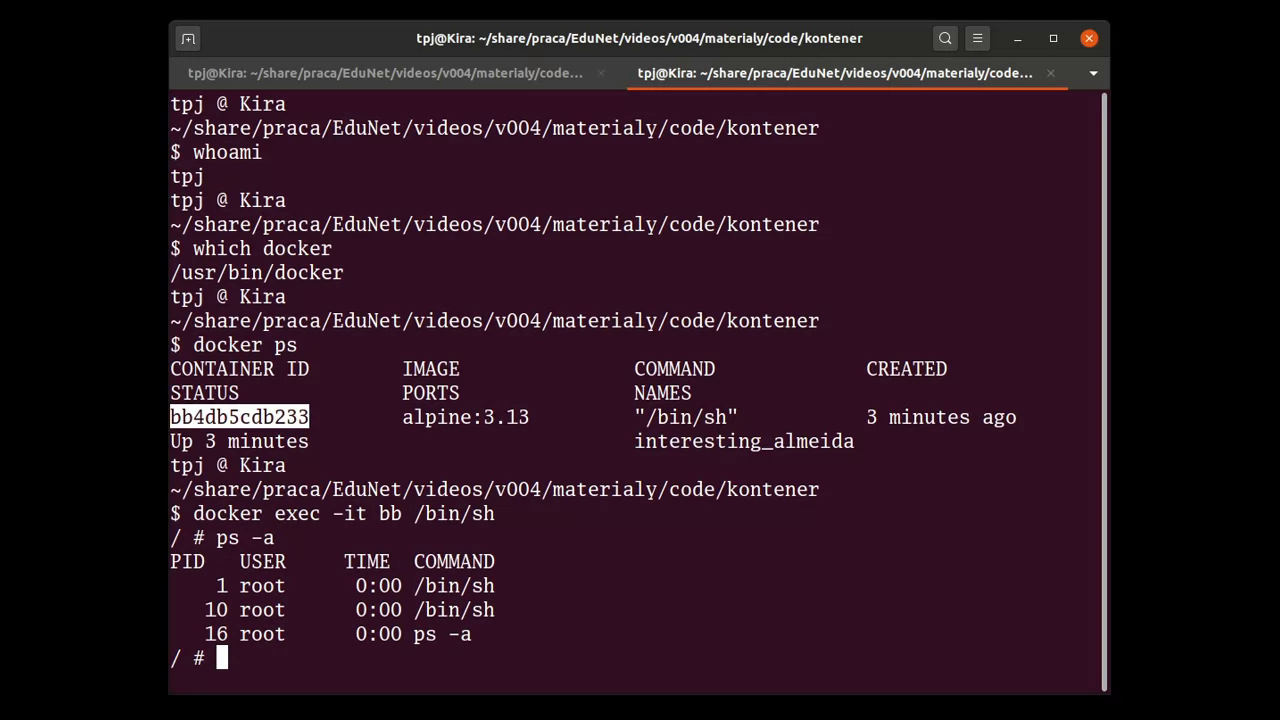
As can be noted, there’s the PID=1 process, which is the original shell, started when the container was created. The new process to note is PID=10, which is the new session, started with the docker exec command. (In fact, in the first process, the ps -a command would also list the process from the new session.)
The running shell process can be finished with the well-known GNU/Linux exit command. After finishing both sessions, since no other processes are run inside the container, it will be also finished. It won’t be listed in the results of the docker ps command, yet it will be listed in the results of the docker ps -a command (since the latter one shows also all the inactive containers).

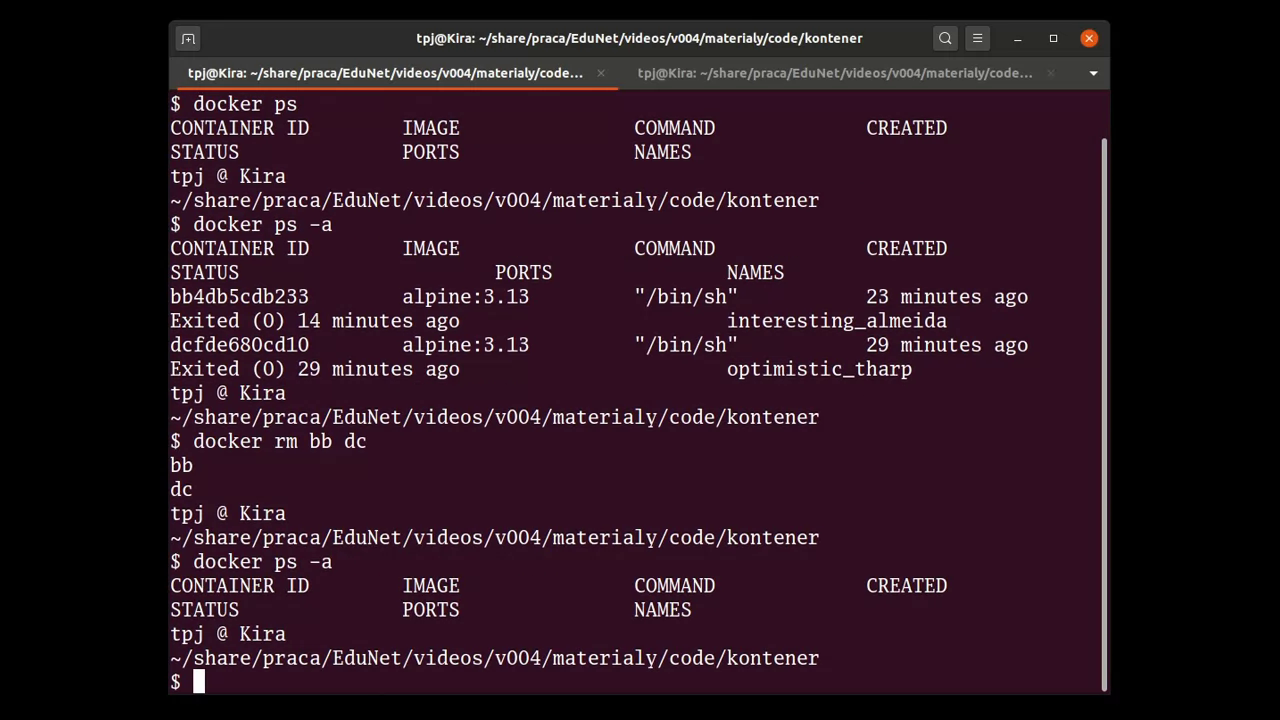
Inactive containers problem
There are no problems with starting new containers. As it was pointed out, when the last process in container is finished, the container is also finished. Such containers can be then found with the docker ps -a command.
And now think about it. Two inactive containers is not a big deal (actually, in general it depends on their size, yet the containers created so far were based on the minimal Alpine Linux image, so it’s really not a big deal). How many containers could be created just in one day? Although it depends on particular day workflow, one should be quite clear: after such creating (and finishing) containers, there will be a lot of them to be listed by the docker ps -a command.
It’s not good. First of all, they all take some storage place on the hard drive. They also make a clutter in the output of the mentioned command. (Is it so important to remember, that some process was finished in a container, created and finished many days ago?) Such containers are no longer needed, and they should be simply removed. It can be done with the docker rm command (the rm stands for “remove”). This command requires a container id as parameter. (More than one id can be specified.)
It seems, that the workflow so far is as follows:
- Start a new container (
docker run ...). - Do your job.
- Finish the container (
exit). - Remove the finished container (
docker ps -a,docker rm ...).
Nothing complex, yet there’s at least one part of this workflow, that can be done better. Whenever a container is run, and it’s clear, that it won’t be needed anymore after it is finished, it should be also removed. It’s such a common use-case, that there’s a special option for it: --rm. Using this option tells Docker to automatically remove the container, after it is finished.
So, when a container is created with the following command:
$ docker run --rm -it alpine:3.13
and then is finished, it shouldn’t be kept anymore.

Container isolation problems
As it has been already mentioned (probably many times), containers are isolated from the OS. That’s a good idea, since it makes working inside container more safe. Even when some damage is done to container, the host OS is not affected in any way, and container can be simply started again. Yet, in some situations, this isolation is cause of problems, that need to be solved.
Using containers to run scripts
Let’s assume, that a PHP script should be run inside a container. How it can be achieved with a Docker container?
The first step is, obviously, starting a new container. The well-known Alpine Linux image can be used:
$ docker run --rm -it alpine:3.13
It’s a base, minimal image, and no PHP interpreter is installed. So, the next step is to install one.
# apk update
# apk add php7
After installation, the PHP interpreter should be available, and ready to be used. It can be checked with the php --version command, and more inquisitive users can also play an interactive session with php -a.

Now, having PHP, it’s time to write the script. For this purpose, the well-known Vim editor can be used. Since it’s also not available in the base, minimal Alpine Linux image, it should be installed in the same way:
# apk add vim
Let’s assume, that the script will be written in the root’s home directory. (Well, it’s not a good idea to work as root, but writing files directly in the root filesystem is even worse.) The script will be as simple as:
<?php

echo "Łolaboga!\n";
(A note for all readers, who don’t speak Polish: please don’t ask me, what this “Łolaboga” means. Sometimes I just make up such funny words, that’s all.)
A slightly more original, than mere “Hello, world!”, don’t you think? ;-) (And, more seriously, UTF8 support can be tested this way.)
The script, once saved in some file, can be tested with the simple command:
# php script.php
(or whatever name the script file was given)
After the script is tested, the container is no longer needed, so it can be closed (the exit command). It should be automatically removed, since it was started with the --rm option.
So far, so good: it’s possible to use Docker container to develop software. There’s a problem, though: no one wants to work this way! Developers have their powerful text editors, and IDEs, already installed and working in their OSes, and they won’t install and use terminal-based tools inside containers to write code. The exercise was good to make someone more comfortable with Docker containers, and to show, that it is possible, yet it’s not the way it is actually done.
Let’s state it clear: code is written in OS, not inside a container.
And here comes the problem: the container is isolated from host OS. Anything that is done inside container, stays there, period. Isn’t there an American saying, that whatever happens in Vegas, stays in Vegas? Well, it’s a similar situation. And the problem is, we need this something to get out of Vegas… I mean the container. What is needed, is some way to access data in OS filesystem, from the running container.
Think about it: a script could be written on host OS filesystem, and then, if it could be accessed from container, the PHP interpreter, installed inside the container, could be used to run the script. That’s much more sane scenario.
Some way to overcome the isolation concept is needed here. In this case, the solution is to mount a volume.
In more details, the situation is quite simple: there are two, distinct, filesystems (one of the host OS, and the other one of the container). Mounting a volume means, that some part of those two filesystems will be shared. Whatever happens to this part, should be visible (and accessible) to both filesystems.
So, the solution is to mount some directory, from the host OS, in some place of the container’s filesystem. If you are familiar with mounting in a GNU/Linux system, it’s a similar concept.
With this new knowledge, the exercise can be performed in a better way. Instead of writing the script inside container (and having to install the text editor…), it should be prepared in the host OS. Having such script, the only thing to do is to start a new container… Only this time, a volume with the script should be mounted.
There are many questions to ask here.
The first question is: how to mount a volume inside a Docker container?
The answer is: using the -v option. The option should be used with the following syntax: -v <host_os_path>:<container_path>. So, some directory from the host OS filesystem should be specified, and then, some directory from the container filesystem, where the requested OS directory will be mounted to.
But here comes another question: which directory from host OS should be used?
The quite obvious answer is: the one, where the script is saved. In fact, using the current working directory is (usually) a good idea.
And where the directory should be mounted to? That’s more interesting question, since there’s no one, valid answer, for all use-cases. The answer is: it depends, on how the particular image should be used.
In the case of alpine:3.13 image, there’s no some specific directory, meant as the place to mount external volumes. It means, than any sane choice for such place can be used.
Let’s assume then, that the volume (current working directory from the host OS) will be mounted to the /home/project (probably there’s nothing else in the /home directory, so this place can be safely used). All that should be done is the following command:
$ docker run --rm -it -v "$(pwd):/home/project" alpine:3.13

As should be noted, after starting the container, the session starts in the root filesystem /. The directory /home/project is available, and the script (prepared on the host OS) is there, ready to be used.
So, the PHP interpreter could be installed, and then the script could be run… But there’s still a way to improve the workflow. Wouldn’t it be better (more convenient) to start the session in the /home/project directory? That’s why the volume was mounted in the first place: we wanted to work there, not in the /!
Fortunatelly, there’a a way to tell Docker the initial, working directory in the started container. The -w <path> option can be used for that purpose:
$ docker run --rm -it -v "$(pwd):/home/project" -w /home/project alpine:3.13
After starting a new container this way, and installing PHP, the script can be executed.
Using containers to run web servers
Knowing how to work with scripts (both writing them in host OS, and running them in container), it’s time to do something more complex. Let’s try to perform the following exercise:
- Start a new Alpine container.
Let’s assume, that a simpleindex.phpwill be mounted there. - Inside the container, install both PHP and curl.
curl is a simple, terminal-based HTTP client. - Then, run the PHP built-in HTTP server, on the port 3000.
In order to test the running server, some requests should be sent. That’s where the curl will be handy.
- Start a separate session, in the same container.
Yes, it’s possible, just as having many sessions is normal in a GNU/Linux system. There’s thedocker execcommand, for that purpose. - Inside the container, using a new session, try to connect to the HTTP server.
- And then, finally, try to connect the HTTP server, this time from outside the container - from the host OS.
So, in the end, the whole exercise is about starting an HTTP server inside a container, and then testing it both from inside, and outside the container. Sounds simple? Get to the work, then.
Starting the container (step 1) is quite simple. In the directory, where the index.php script is placed, the following command should be executed:
$ docker run --rm -it -v "$(pwd):/home/project" -w /home/project alpine:3.13
Installation of PHP and curl (step 2) is also quite simple:
# apk update
# apk add php7 curl
The PHP built-in server can be started with the -S option, as follows:
# php -S 127.0.0.1:3000

Then (step 4), a new session can be started (probably using some separate terminal window, or tab). In order to start a new session, the running container id is needed. It can be found with the docker ps command.
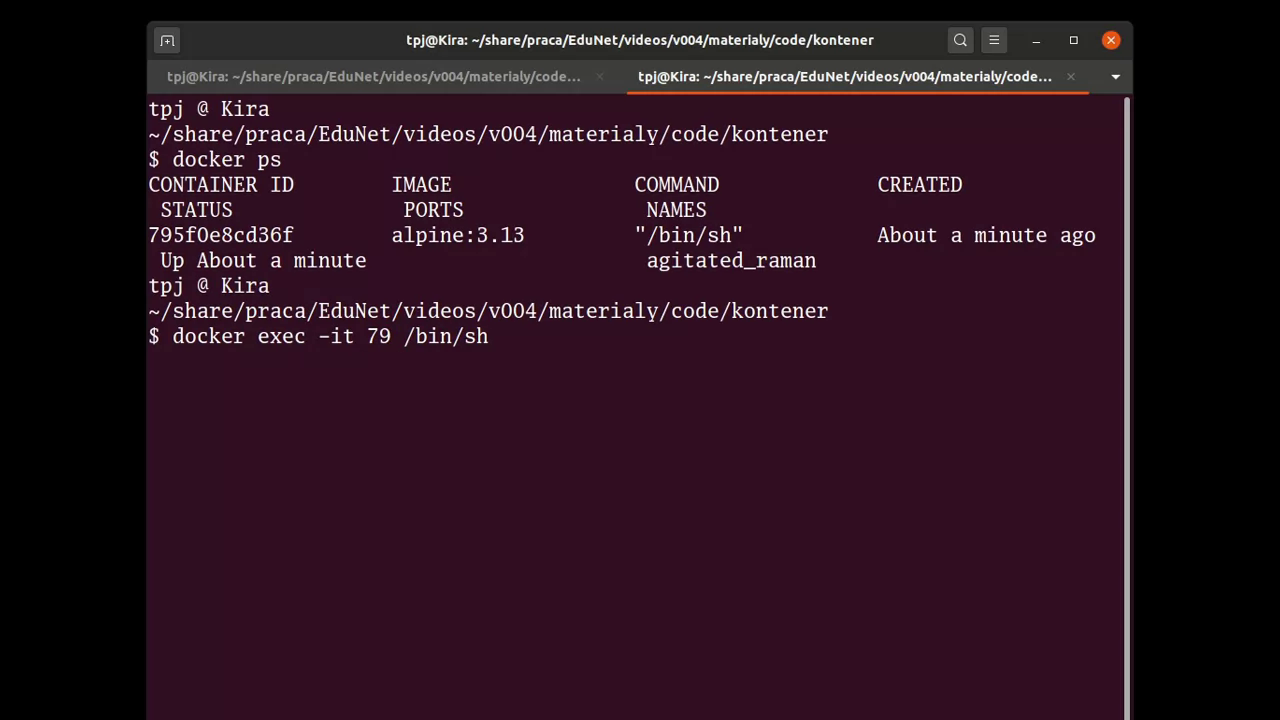
In our case, the id is 795f…(something), so the first two characters should be fine:
$ docker exec -it 79 /bin/sh
Inside the container (step 5), the server can be requested:
# curl "127.0.0.1:3000"
Of course, it should work. There’s absolutely no reason, why this simple check could fail. BTW, the request should be visible in the running HTTP server logs (they are printed directly to the terminal). Go ahead, and check them.
The final step is trying to request the server from the host OS (using the same, curl command):
$ curl localhost:3000

And here is a problem. Not only the connection was refused, but the request didn’t even get to the web server (it is demonstrated in the video: the request wasn’t logged).
It seems, that the web server can be accessed from the container, while cannot be accessed from outside it.
Why it is so? Well, the answer is in container isolation. Anything that is inside the container, stays there. (Remember Vegas?) And the problem gets serious, when some access is needed to the network inside container.
It’s obvious, that there’s some network inside container: internet can be accessed, packages can be installed. The problem is then, getting access to that network.
The solution of this problem is twofold. Some port should be exposed (from container to the host OS), and the server inside container should be bound to the correct network interface (but we’ll get to that part eventually).
Let’s start with the port exposure: it can be achieved with the -p <host_port>:<container_port> option:
$ docker run --rm -it -v "$(pwd):/home/project" -w /home/project -p 3000:3000 alpine:3.13
Using such command, the port 3000 in the host OS is bound to the port 3000 inside container. It means, that whatever comes to the port 3000 on the host OS, also comes to the port 3000 in the container - and vice versa.
Then, all the other steps can be repeated, without any changes. Everything should work fine: it should be possible to access the server from inside the container (so nothing was broken so far).
And then, when we try to access the server from the host OS, all we’ll got is an error message: the server still cannot be accessed. That’s because the web server is running on the address 127.0.0.1, and our request from outside is coming to a different address.

Take a closer look at the picture above. There are two different network interfaces: “lo” (loopback, the localhost) on the address 127.0.0.1, and “eth0” on the address 172.17.0.2. The second interface is the bridged network interface, created by default by Docker, yet it doesn’t matter. What is important, is the fact, that there are two distinct network interfaces, and only one of them is meant for network communication with the world: the “eth0”.
(Please also don’t pay attention to the address 172.17.0.2. I suppose it could be different. The address doesn’t matter. What matters is the fact, that the “eth0” network should be used to communation with the world, regardless of the address the network operates on.)
When the curl was used to send a request to the web server, the request was sent to the “eth0” interface. The problem was the server had been listening on the localhost interface, so the request never reached the server.
The way to solve the problem is to bound HTTP server to all network interfaces, so it can be accessed with both localhost, and “eth0”. It can be achieved with the following command:
# php -S 0.0.0.0:3000
The 0.0.0.0 address is used as an alias for “all available network interfaces”.
After such modifications, the PHP built-in HTTP server should be accessible from both inside, and outside the container. (It is demonstrated in the video.)
There are two conclusions from this exercise:
- In order to access a network inside container, some port should be exposed.
- When a server is run inside container, pay attention to both the port, and the network interfaces, on which the server is listening for connections.
3rd-party libraries (or whose files really are)
Sooner or later (probably sooner…), each real-life project requires some 3rd-party libraries to be used. And, what should be quite obvious, before library is used, it has to be installed.
Since the container is isolated (that’s probably the most used word in this material…), a way is needed to install such external libraries, so they can be both accessed inside the container, and managed from outside of it. Of course, it is possible to work with mounted volumes, as it has been already presented - and that’s one possible solution to this problem.
Yet, at least one another solution is possible - and any Docker user should be aware of it, and be aware of all its pros and cons. The solution is simply to prepare a dedicated Docker image, with the preinstalled libraries.
It should be made clear, what it is all about. Let’s consider Python. It can be installed from some package, and (usually) it comes with its rich standard library (“batteries included”). There are many other libraries (and frameworks), though, which are not a part of it. They can be installed locally, in project’s directory, or they can be installed system-wide, using system’s package manager. …
(One side-note for all Windows users: I have no idea, how this problem is solved outside the GNU/Linux world. In GNU/Linux, we have software repositories, and packages can be installed from them.)
… So, provided that a library is available in some software repository, it can be installed in two different ways: either locally, or system-wide. The latter way allows to prepare Docker image, with some libraries available system-wide. With such an image, containing pre-installed libraries, the libraries will be available inside containers.
And what can be told about those images, with libraries “built-into” them?
Let’s assume, that the library is a live project. It’s possible, that at some point of time, the library will be upgraded. A new version is published, and it should be used in developed project, since some important changed were made to the library (perhaps bug fixes, maybe some new useful features).
In such a situation, there’s a problem. The only way to upgrade the library is to build a new image (with upgraded, new version of the library). In other words, an upgraded image is needed.
Not a big deal (despite the fact, that you may not know how to build custom Docker images, but be patient - we’ll get to that) - just build a new image, and the problem is solved! Well, not so fast… Upgrading the image is just one part of the problem. The other part is using the new image. Whenever image is upgraded, all team members are expected to use it. It means, that they have to get the image, install it, and use it. It means, they probably have to also upgrade some custom-written scripts, and so forth.
It should be made clear: it’s not convenient, and it shouldn’t happen often. The larger team, the more problematic such situation is.
Does it mean, that such solution should be always avoided? The short answer is: no.
The longer answer is: some libraries are specific. Libraries can have their own dependencies. Sometimes, those dependencies are native - it means, that they are compiled for particular operating system (and, perhaps, the Glibc library…). Such dependencies are usually installed system-wide (it’s the easiest way to manage them). In such cases, the easiest solution is to also install the library system-wide.
Think about it: there’s a library with such native dependencies, and it is installed locally. When the library is upgraded, there are two possibilites: either its dependencies also have to be upgraded, or they don’t. In the latter case, the library upgrade can be performed locally. In the first one, it cannot (dependencies are native, and installed system-wide).
So, when dealing with libraries, especially with such ones, which are wrappers (or bindings) for some other, native dependencies, having custom image is the only sane option.
Fortunatelly, such cases are rather rare, or very specific, like GUI libraries (which are usually well-matured, and do not change very often; or, at least, I think so).
And, for a little practice, let’s try to use a container to create a brand new, Python project, and (locally) install some library. What should be done:
- Start a new container.
- Install PHP inside it.
- Start the PHP built-in HTTP server.
- Start a new session inside the container.
- Install Python inside the container.
- Create a new, local project in Python.
- Install an external library (requests), to make HTTP requests.
- Connect to the HTTP server, using the library.
Just to remind you, in order to start a new container, the following command should be used:
$ docker run --rm -it -v "$(pwd):/home/project" -w /home/project -p 3000:3000 alpine:3.13
(please note, that /bin/sh is the default command to be run, so it doesn’t have to be specified after the image name)
After starting the container, installation of PHP and starting the built-in HTTP server is done with the following commands:
# apk update
# apk add php7
# php -S 0.0.0.0:3000
It’s also good to have some handy index.php script, to serve some response:
<?php

echo "Łolaboga!\n"
Starting a new session should be quite obvious right now. I won’t specify the commands here, for several reasons. First of all, the commands have been already specified (they can be found in this text). Second, they can be watched in the video (go ahead and watch them, it starts at 7:19; the commentary is in Polish, but the commands themselves are not). Third, you should perform such exercise by yourself. (Believe me, mere reading and watching videos won’t teach you any skills; practice will.)
(Just one, small tip here: in order to create a new session, the exec command is needed, and this command requires the running container id. A control question: how can this id be found out?)
When a new session is started, the Python can be installed with the following command:
# apk add python3
In order to create a local, development environment for Python, the following command should be used:
# python3 -m venv .
The venv tool will be explained in more details in the next video/material. Right now, everything that should be known, is the fact, it creates a local environment (directories and files) to work with Python, which allows user to install libraries locally (in the environment), instead of system-wide. Hence, the installation can be performed by regular users (not admins). To use the environment, it should be activated:
# . bin/activate
Please note the space between the dot . and the command bin/activate - it means, that the bin/activate script is sourced into current, working shell process. (Explanation, what is shell sourcing, is beyond the scope of this material. If you want to know it, go ahead, and look for the answer.)
Once the local environment is activated, the shell prompt should be affected, as can be spotted in the following screenshot.

Having the local environment, the requests library can be installed with the pip command:
# pip install requests
And when the library is installed, it can be used:
# python3
>>> import requests
>>> r = requests.get('http://localhost:3000')
>>> r.status_code
>>> r.text
Of course, it’s nothing new. The same commands were used to perform one the previous exercises. What’s the difference now, is that the focus is on management project locally, and on installing external libraries.
Once the container is not needed anymore, it can be finished (the exit command). So, if the focus now is on local project management (including 3rd-party libraries installation), the created files and directories should be available from the host OS level. They can be examined with the well-known ls command. And the output of this command should look well: all the files and directories, created during the container session, are in the mounted host OS directory. But it’s not so good at the closer look (the ls -l command):

The problem should be quite obvious: all the created files belong to the root! It means, that the regular user cannot modify/delete them, and hence is unable to work on them. Development is a process, when files are created, modified, deleted, and being unable to perform such basic tasks means being unable to work.
Why this has happened? The answer is quite simple. When a container is run, some process is run inside it. The process is owned by some user, just as on any GNU/Linux system. In our case, the user was root. As the result, all files and directories, created by the process, belonged also to the same user - to the root. That’s why the local environment, created with the python3 -m venv . command, was owned by root.
(And since the PID of root both inside the container, and on my host OS, is the same, it is also recognized as root by my host OS.)
Of course, the desirable situation is when all the files and directories, created inside running container, are owned by the regular host OS user. It means, that the process inside container should be also run as the regular host OS user. And that’s a problem, since inside container no such user exists.
(When was the container isolation problem mentioned? Was it a long enough time ago?)
The problem can be solved, though. In fact, no particular user is needed inside container. In a GNU/Linux system, all users have some UIDs, and all groups also have some GIDs. Both users and groups are recognized (identified) by UIDs and GIDs. The solution is to tell Docker to run a process, with some particular UID and GID - and to set those values to the ones used by the regular host OS user.
It is possible, yet the exercise program should be slightly modified:
- Start a new container.
- Install all the needed software: PHP and Python.
- Start the PHP built-in HTTP server.
- Start a new session inside the container, as a regular user.
- Create a new, local project in Python.
- Install an external library (requests), to make HTTP requests.
- Connect to the HTTP server, using the library.
And, btw, while working as the root, all the old files and directories, created while the last session was active, could be removed. It’s much easier to remove them while being root inside a container, than becoming a root in the host OS.
Since the commands are (almost) the same, they won’t be listed here. Readers are advised to practice them by themselves; everything is also presented in the video (part 4).
The only new commands needed may be the ones to obtain the regular user’s UID and GID. The commands are:
$ id -u `whoami`
$ id -g `whoami`
Having known both UID and GID, the session can be started with the exec command as follows:
$ docker exec -it -u UID:GID <container_id> /bin/sh

Please note the prompt - it’s one of a regular user, not the root. That’s because in such started session, user has no root privileges. (And that’s the reason, why all the software had to be installed as the root, in the second step of this exercise.)
Creating the local Python environment, as a regular user, will cause all the directories and files to be owned by the regular user, and hence they can be managed as the host OS regular user. Problem solved!
Docker run and exec commands options summary
As it was already written (said?), managment of Docker containers is more complex, than managment of Docker images. The complexity is in options. I tried to introduce them in some order, to demonstrate, that they are meant to solve particular problems.
The known phrase says: repetitio est mater studiorum, so let’s review all the options once again:
-
The
--rmoption is used to automatically remove containers, when they are finished. Using this option saves the neccessity to remove them manually, so they won’t take any storage. -
The
-itoptions are used (together) to run container in interactive mode, with attached terminal. As the result, it is possible to work (interact) with container, using a console terminal, in a similar way to working on the host OS. -
The
-v "$(pwd):/home/my/project"option is used to mount the current working directory, into the/home/my/projectone inside the container. It is needed, when some files/directories should be shared: they are needed both in the host OS, and inside the container. -
The
-w /home/my/projectoption is used to set the initial working directory, inside the container. This option can be used together with the-vone, to start work in the mounted directory. -
The
-p 8000:9000option binds the host OS port 8000 to the container’s port 9000. It is used to expose some container ports to the host OS. -
The
-u $UID:$GIDoption is used to work inside container as the user (and group) of some particular UID and GID. It’s neccessary, when some container processed shouldn’t be run as root, but as some host OS regular user.
There are many more options, which can be used. All readers are encouraged to learn about them in the Docker project’s documentation. The options, mentioned above, are the most base ones, needed to start working with Docker containers.
Usage tips
The number of options is quite large, and it makes using Docker more complex. To be honest, Docker is quite a sophisticated piece of software, used to solve an important problem, so it can be complex. No wonder, why so many different options are needed - they are many different Docker use-cases.
Is it possible to make Docker usage simpler? Easier? Or are we all doomed to remember all those options? (Personally, I refuse to remember such options, as I refuse to remember ASCII codes, and even some APIs. That’s what documentation is for!)
Well, it is. A shell alias can be defined to simplify starting a new containers (or new sessions). And in more complex cases, a shell script can be used.
The script!
I’ve been using Docker for many years, having both successes and failures. As the result of my experience, I have written a simple shell script to make my work easier. The script is meant to help in 95-99% of all my Docker use-cases (please note: it’s 95-99%, not all of them!). The script is as follows:
#!/bin/bash

# Usage:
#   docker.sh port workdir image command
#   docker.sh workdir image command
#   docker.sh nouser port workdir image command
#   docker.sh nouser workdir image command

# Just for safety...
if [ "`pwd`" == "$HOME" ]; then
  echo "Cowardly refuse to run in home directory."
  exit 1
fi

# Get the UID and GID
USER="`whoami`"
USER_ID="`id -u $USER`"
GROUP_ID="`id -g $USER`"

# Get the parameters (and route flow control)
if [ -z "$4" ]; then
  #   docker.sh workdir image command
  WDIR="$1"
  IMAGE="$2"
  CMD="$3"

  exec docker run --rm -it -v "$(pwd):$WDIR" -w "$WDIR" -u $USER_ID:$GROUP_ID $IMAGE $CMD

else

  if [ "$1" == "nouser" ]; then

    if [ -z "$5" ]; then
      #   docker.sh nouser workdir image command
      WDIR="$2"
      IMAGE="$3"
      CMD="$4"

      exec docker run --rm -it -v "$(pwd):$WDIR" -w "$WDIR" $IMAGE $CMD

    else
      #   docker.sh nouser port workdir image command
      PORT="$2"
      WDIR="$3"
      IMAGE="$4"
      CMD="$5"

      exec docker run --rm -it -v "$(pwd):$WDIR" -w "$WDIR" -p "$PORT" $IMAGE $CMD
    fi

  else
    #   docker.sh port workdir image command
    PORT="$1"
    WDIR="$2"
    IMAGE="$3"
    CMD="$4"

    exec docker run --rm -it -v "$(pwd):$WDIR" -w "$WDIR" -u $USER_ID:$GROUP_ID -p "$PORT" $IMAGE $CMD
  fi
fi
At the beginning, all the supported use-cases are mentioned. In fact, there are only two different ones (with two variants for each):
- One use-case is when some server is needed, and thus some ports should be exposed. The command is
docker.sh <port> <workdir> <image> <command>. - Another use-case is when no port exposure is needed. In such cases, the port part can be ommited:
docker.sh <workdir> <image> <command>.
The remaining two use cases are the same, both with one difference: the nouser part, before the port, or workdir.
The script starts with a simple test: was it called from the user’s home directory? Because in such a case, it refuses to run.
Why? Well, I have mentioned many successed with Docker, but also some failures… Probably this one was the most spectacular (and the most serious, the most terrifying also). By accident, I started a container with my home directory mounted inside it. I’m not sure, what happened later. All I know is that when I tried to start my computer on the next day, it refused to log me in. I found out, that my home directory was no longer owned by my user. (That’s why I was refused to log in: my user had no access to its own home directory.) I had many problems with fixing things, and it was very unpleasant experience. I had learnt one lesson, though:
NEVER mount your home directory inside container!
So, I added this simple condition at the beginning of the script.
After this check, the script finds out the user’s UID and GID. It will be needed, when the process started inside container should be owned by our regular system user, and not by root. The trick, of course, it to set proper UID and GID for container’s user.
All the following instructions are simply control-flow routing, based on the detected use-case. Once the route is known, the parameters are read, and then the Docker container is properly started.
The first use case can be detected by lack of the fourth parameter (docker.sh workdir image command). In such case, the container is started with the --rm and -it options, the current working directory is mounted to the one requested, and both UID and GID are set. And that’s it.
Then the routing gets more complex (but not too complex…). When the first parameter is “nouser”, it means, that one of the two last use-cases is requested. Both the use-cases differ by the number of parameters, so when the fifth parameter is not defined, it means, that the third use-case is actually requested (docker.sh nouser workdir image command). The container is started in similar way, with both the options --rm and -it, yet without setting the UID and GID of the user.
And, when the fifth parameter is specified, the only difference in starting the container is exposing the requested port (or ports).
The last use-case is detected as the alternative to two previously detected ones: knowing that it’s not one of the “nouser” cases, and that the fourth parameter is defined, it can be only docker.sh port workdir image command.
All in all, the script does four things for user:
- handles the options
--rmand-it, - handles the option
-u $UID:$GID, when requested, - handles the workdir (options
-vand-w), - prohibits mounting the user’s home directory inside container.
Running Docker is still quite verbose, but less verbose, than without the script.
Usage of the script won’t be described here - it will be presented in the next materials on Docker.
Summary
It’s been a really long material, but let’s try to sum up the most important things:
- hub.docker.com is a good place to look for Docker images.
- Images are important, since Docker containers are based on them.
- Starting Docker container is somewhat complex (there are so many options!)…
- …so it can be simplified with an alias, or a shell script.
In the next episode of this series, Docker usage in software development will be demonstrated.
Comments